If you're checking in from Metric Land, read 'centimeters' wherever I say inches and you should be okay. Again, e-mail me with questions.
EASY PART:
All right, you need to measure your gauge swatch, twice: You need to know what the stitches per inch/cm figure is, and you need to know how big the motif is. If you want help on exactly how to do that, hit "Knitting gauge for math geeks" on my sidebar for basic gauge, and "Gauge part two" for how to measure the motif. You also need to know how big around you want the body of your sweater - for that I suggest measuring something similar that you like the fit of. I measured an oversized shirt I wear as a jacket.
Next, get your stitches per inch figure (we'll say five stitches per inch) and your measurement for how big you want the body of your sweater (we'll say thirty-six inches, though if you really wear a 36 inch jacket you're skinny and I hate you because I'm dieting again). Multiply your stitches per inch times the body measurement in inches (or cm per inch and the body in cm) to get your tentative body figure:
5 sts per inch x 36 inches = 180 stitches.
Again, this is tentative until we figure out how many stitch patterns will fit into it. To do that, divide your final stitch count - in this case 180 - by how many stitches are in the motif - 18.
180 divided by 18 = 10
You're in luck. You've got ten motif repeats fitting in very neatly, and YOU NEED AN EVEN NUMBER OF REPEATS, so you can go with this number. DON'T FORGET THE +1 PART. Remember? The pattern repeat is 18 stitches plus one? So add in your one.
And you would cast on 181 stitches.
Write down the 181 figure somewhere you won't lose it (I keep all information like this on the paper I printed out the chart on), because you'll need it later. It is officially the 100% figure, or the Key Number if you've read Elizabeth Zimmerman.
If you're only off by a few stitches - you need to add or subtract less than a half-inch's/1 cm worth of stitches to make the motif fit into the figure you came up with, do it. It's knitting; it stretches. Not to mention, it's a jacket, so a half inch of fit isn't going to be very noticeable. Ah, but what if you're totally off and nothing will fit?
THE HARD PART:
This is for anyone whose motif repeats will not fit neatly into their body measurement number. Like me.
I wanted a jacket 46 inches around. My gauge swatch was knit at 4.9 stitches per inch.
46 x 4.9 = 225 So I needed my jacket to be somewhere in the neighborhood of 225 stitches around. And remember, we need AN EVEN NUMBER OF REPEATS.
12 pattern repeats at 18 stitches = 216 Not big enough; it would be off by two inches, which was way too much to fudge.
14 pattern repeats at 18 stitches = 252 Way too big, like 51 inches around, again too much to fudge.
So I needed 12 pattern repeats plus some extra stitches. I drew a map.
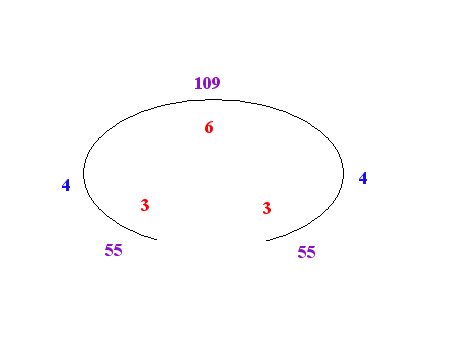
The black line is a bird's eye view of the jacket body, with the opening of the cardigan at the bottom center. The figures in red are pattern repeats. I decided on twelve pattern repeats, which is three for each front, and six for the back. I wrote them in. Those are the red numbers inside the jacket.
Then I figured how many stitches each GROUP of motifs was. WITH EACH GROUP YOU HAVE TO ADD THE +1 STITCH. So for three pattern repeats, it was (3x18)+1=55 stitches. I wrote that on the outside of the jacket map - those are the purple numbers. 55 on each front, and then 109 on the back (six pattern repeats + 1 is 109).
Adding those up, I got 219 stitches. Close, but not close enough. I decided to add four stitches at each arm pit, between the front and back motifs, to make up the rest of the needed stitches. Those are the blue numbers on the jacket map.
55 + 4 + 109 + 4 + 55 = 227.
My original stitch figure was 225. I decided to keep the two extra stitches for luck. I worked them as stripes. You can also work checkers, flowers, zig-zags, or anything else you can think of that fits into the number of stitches you add. (I wanted to show you a photo of the stripes here but BLOGGER SUCKS.)
So that was my 100% figure: 227. I've got "100% = 227" written on my chart, and circled.
**100% IS THE ACTUAL NUMBER OF STITCHES YOU CAST ON, NOT ANY EARLIER ESTIMATE.**
Feel free to e-mail me for help on this, but I will need stitches per inch or cm, measurement of the motif, and how big you want your jacket body to help you out.
On to the hem!


4 comments:
You are so good to offer such help to folks....Happy 2007 to you!
yay. Steek along time. I rushed to finish some socks last night in the hope this would be up today! Now, if I can just wake up and take this all in....
I've been doing this since 6am this morning! I've been emailing Julie but though I should post publicly so others who are starting can see someone else is, too.
I got through it. a fair amount of hand holding/spoon feeding took place. But I got there and am about to go out and buy a 2.25mm circ (that's the smallest I can get) to start my hem.
My husband, upon seeing my page of calculations, said it's a miracle. Someone has forced me to play with numbers in a way I've always been afraid to. Julie, I think he thinks you're a marvel!
I can't believe I have to cast on almost 340 stitches! That's what I get for working in 5ply on small needles.
Take comfort. I'm in the middle of casting on 420 stitches for that lace curtain for my kitchen that I mentioned.
Here's hoping I have enough yarn. Ha.
Post a Comment